


How long does it take to install a Home Lift from start to finish?
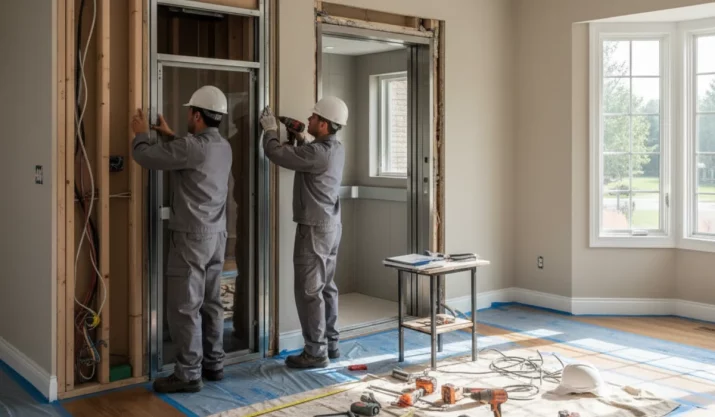
Table of Contents
- Key Takeaways:
- Understanding the Home Lift installation timeline
- Step-by-step installation process
- Types of Home Lifts and their installation timeframes
- Factors that can extend the installation timeframe
- Residential home lift installation in existing homes
- Post-installation: what homeowners should expect
- Making the right Home Lift installation choice for California homeowners
- FAQs
For many California homeowners, a Home Lift is not just convenient. It gives you independence. If you care for an aging parent, plan to age in place, or need help after a mobility change, a Home Lift helps you stay safe and comfortable where you live.
If you’re considering adding a Home Lift, you may wonder how long the installation process takes. There is no single timeline for Home Lift installation. Timing depends on your home’s layout, the home lift type, and whether it’s a new build or a retrofit.
Knowing the steps and timing helps you plan with confidence. This guide explains a typical Home Lift installation timeline, the steps involved, and the factors that affect timing. We also cover retrofits in existing homes, including what to expect after installation and how a professional team can assist.
Key Takeaways:
- Most residential home lift installations take 4 to 8 weeks after on-site work starts.
- New builds move faster; retrofits often need extra time for structural work.
- The type of home lift you choose, whether it be hydraulic, traction, pneumatic, or MRL, affects both complexity and installation time.
- Every installation concludes with a final inspection to verify code compliance and ensure safe functionality.
Understanding the Home Lift installation timeline
Installation usually takes one to two months. Planning and permits can add time to the overall project. For new builds in cities like San Diego or Sacramento, installers can add the hoistway and machine room to the build schedule. Then the home lift goes in quickly once the structure is ready.
For existing homes, the process involves retrofitting. Contractors may need to build an home lift shaft, adjust mechanical systems, or reinforce framing. These steps take time but ensure the home lift operates safely. Since California has strict building codes, expect extra time for plan review and permits in some cities.
Choosing the right Home Lift company matters. Experienced installers plan, schedule inspections well, and keep you updated on timing. Some companies assign a project manager and share a direct number for questions during the build.
Step-by-step installation process
Every Home Lift installation follows a sequence for safety and efficiency.
Site preparation
The project starts with site preparation. Contractors measure space, check overhead clearance, and confirm the foundation can support the home lift. In retrofits, they may open walls or floors to build the hoistway. Installers coordinate with electricians to plan connections for power and controls.
Building the structure
Next, builders construct the hoistway and, if needed, a machine room. For hydraulic home lifts, this includes a pit and a separate room for the pump and fluid controls. Traction home lifts need counterweights and more overhead space. Pneumatic and MRL systems require less structure, allowing for faster installation.
Installing the home lift system
Once the structure is ready, installers bring in the home lift system. This stage includes rails, cab assembly, doors, and communication lines. During this phase, finishing work such as drywall, flooring, and trim blends the home lift with your home’s interior.
Adding safety systems and features
Modern residential home lifts include safety features such as emergency brakes, backup power, and accessible controls. Installers test these systems on-site before the inspection.
Final inspection and approval
Local officials perform a final inspection. They check safety systems, code compliance, and performance. Once approved, you can use your home lift every day.
Types of Home Lifts and their installation timeframes
The type of Home Lift you choose affects installation time.
- Hydraulic home lifts: Reliable and smooth, but they need a pit and a machine room. Extra excavation and plumbing can add time.
- Traction home lifts: Use counterweights and cables. They require more overhead clearance and are suitable for taller homes with multiple stops.
- Pneumatic home lifts: Faster to install because they don’t need a shaft or machine room. Popular in existing homes with limited space.
- MRL (machine-room-less) home lifts: Save space by housing equipment within the shaft. Often faster to install than traditional hydraulic systems.
Your home lift manufacturer and installer will guide you in selecting the right home lift based on your space, budget, and desired functionality.
Factors that can extend the installation timeframe
Even with a clear schedule, delays can happen. Common causes include:
- Retrofitting challenges: Older homes may need structural changes or wiring updates.
- Permit reviews: City and county agencies in California may take weeks to approve plans.
- Custom home lift options, such as special finishes, higher weight limits, or energy-saving features, may require additional lead time from the manufacturer.
- Scheduling conflicts: Coordinating carpenters, electricians, and installers can cause minor delays.
A trusted Home Lift company can explain these possibilities upfront to help you understand and keep your project moving.
Residential home lift installation in existing homes
Many homeowners ask how a residential home lift fits into an existing house. A retrofit requires careful design to minimize disruption and ensure the home lift remains safe and functional.
Installers look for unused corners, closets, or stacked spaces. A two-story home in Los Angeles might use space near a stairwell, while a multilevel Bay Area home may add a new shaft near the garage.
California homes vary, from condos to historic houses, so every retrofit is different. With good planning, even compact homes can fit an home lift.
Post-installation: what homeowners should expect
After your home lift passes the final inspection, you move into post-installation. You’ll learn how to use the home lift, test the controls, and review maintenance.
Most companies train homeowners on safety systems and recommend a service plan. Routine maintenance helps keep your home lift in good condition and reliable for years.
If you or a loved one living with you plans to age in place, keep up with maintenance. Regular service protects your investment and gives you confidence that your home lift will remain safe and dependable.
Making the right Home Lift installation choice for California homeowners
Adding a Home Lift is an investment in long-term independence and accessibility. With the proper planning and support, you can enjoy a smoother daily routine and keep every level of your home within reach.
California Mobility offers trusted guidance for homeowners looking to add a residential home lift in California. Our team helps you choose a model that fits your lifestyle and handles the details from permits to finishing touches.
Contact us today or request a free quote and start your Home Lift project with confidence.


