


21 Chair Exercises for Seniors: A Comprehensive Visual Guide
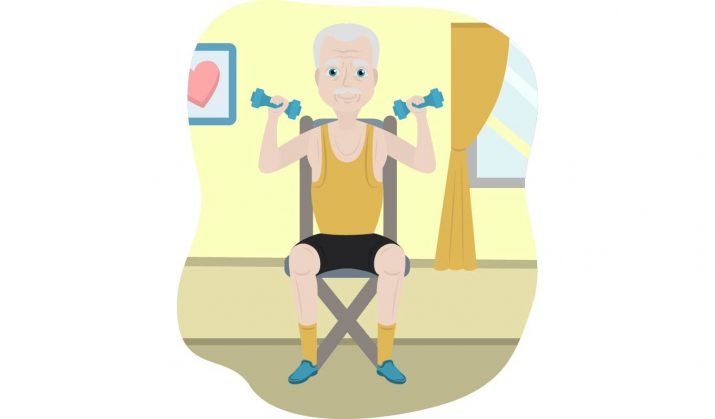
Table of Contents
Introduction
No matter what age we are, exercising is very important, especially for those of us who may be over the age of 65. Whether we enjoy it or not, exercising on a regular basis continues to keep our body moving and functioning properly as we age. Without getting up and entertaining our muscles with movement, we reduce our chances to age healthfully.
As a senior, your loved one might love or hate exercising, but they’ve continued to be told, “exercising is healthy for you!” What if, now, they’re experiencing a mobility block? In younger years, they might have been able to run 10 miles a day or compete in a triathlon, now it’s just getting harder to even stand.
“The most interesting trait of the human body is that it is always changing, literally, it cannot stay the same. With this in mind, it is constantly adapting to what you put it through. If you exercise, muscles adapt by getting stronger. Research through NASM shows exercising 2-4 times per week for 30 minutes is very beneficial for seniors.”
– KIME PerformanceIf an older adult is having trouble with moving around on their own and finding it difficult to get even a little bit of exercise in the day, they shouldn’t worry too much because there are still ways to exercise without even having to move from a chair!
Chair exercises are a great substitute for aging adults. There doesn’t need to be a weight set, a trainer, and seniors don’t even have to have a caregiver with them at all times. The only thing a senior needs is a chair; though, some of the following exercises may require a resistance band or dumbbells to perform accurately with results.
Please keep in mind, everyone has different levels of comfort when it comes to exercise. For safety, it’s important to start slow and develop a health program that is tailored to your abilities.
Benefits of Performing Chair Exercises
Exercising on a regular basis (preferably at least 30 minutes per day) will not only keep an aging adult’s heart healthy, but can also prevent strokes, heart attacks, falling, high blood pressure, and chronic diseases such as dementia.
Not everyone over the age of 65 is able to move agilely or even out of their seat, but this shouldn’t mean that they can’t exercise. So many regular exercises can be done while using a chair as a mobility device.
All of the above benefits can still be reached when a senior uses even a regular chair. They don’t have to go out and get something brand new just so they can start moving around, a completely ordinary chair will do. This chair should be stable with four legs, no wheels or rollers, and for most exercises, without arms.
We’ve got a great list of exercises that seniors can do in the comfort of their own home with equipment that they can use by themselves. We’ll explain exactly how to do each exercise and provide examples for a step-by-step process.
Consult a Doctor
Before getting started on any of these exercises consult a doctor if:
- Recently went through surgery
- Have any recent injuries that could be agitated by over-using a particular muscle or set of muscles
- Can’t physically perform the perfect posture during any exercise (even the slightest difference to the correct form of each exercise could result in pain or further injury)
The list we’re providing is not one-size-fits-all. Injuries could make some exercises difficult and might need to be avoided altogether. It shouldn’t be assumed that a senior can enact a particular exercise if they are instantly or progressively feeling pain. If this occurs, they must return to a comfortable position and stop the exercise entirely.
If you’re a caretaker of a senior and you don’t know if you’re legally permitted to enact any of the following exercises, keep safety in mind.
The following chair exercises for seniors are outlined with visuals to conceptualize exactly how to perform each individual exercise. Each exercise should be done by following the appropriate time, repetitions, and sets outlined.
Table of Contents
Arm Exercises
1. Seated Shoulder Press
2. Seated Front Shoulder Raises
3. Seated Chest Press
4. Modified Push-Ups
5. Seated Bicep Curls
6. Isolated Tricep Extensions
Core Exercises
7. Knee-to-Chest
8. Extended Leg Raises
9. Leg Kicks
10. Modified Planks
11. Tummy Twists
Leg Exercises
12. Sit-to-Stands
13. Modified Squats
14. Knee Extensions
15. Heel Slides
16. Seated Calf Raises
Stretching Exercises
17. Neck Turns
18. Seated Backbend
19. Seated Overhead Stretch
20. Seated Side Stretch
21. Seated Hip Stretch
Arm Exercises
Shoulders
We use our shoulders for a great many purposes. Our shoulders carry massive loads, some of us sleep on our shoulders, we fall and lean on them, and there are a variety of regular movements we make in the day with our shoulders. Training our shoulders has massive benefits to our capabilities while using our arms.
If a senior isn’t able to have a full or even minimal amount to their range of motion in their shoulders, they could experience a lack of strength, pain in other parts of their body for picking up the slack, or reduced function in their day-to-day activities.
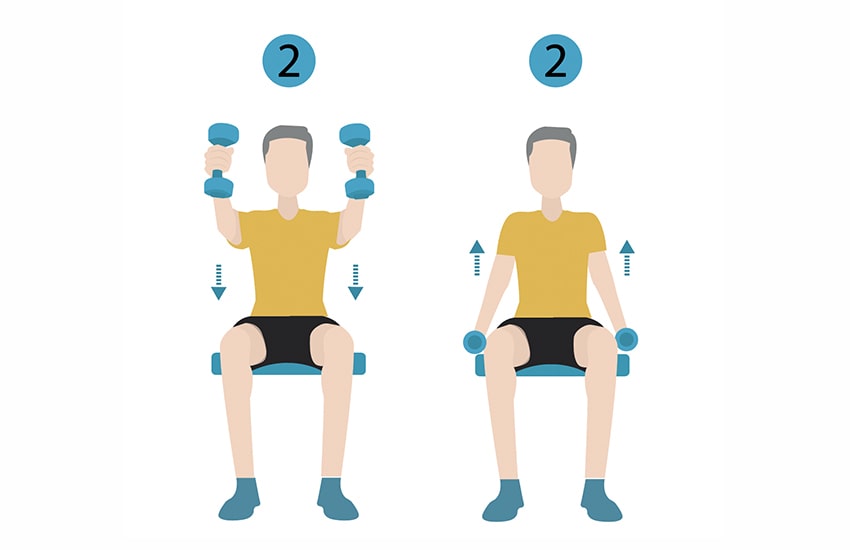
1. Seated Shoulder Press
| Difficulty | Sets/Reps | Time |
| Easy | 2-3/8-12 | 4 Minutes |
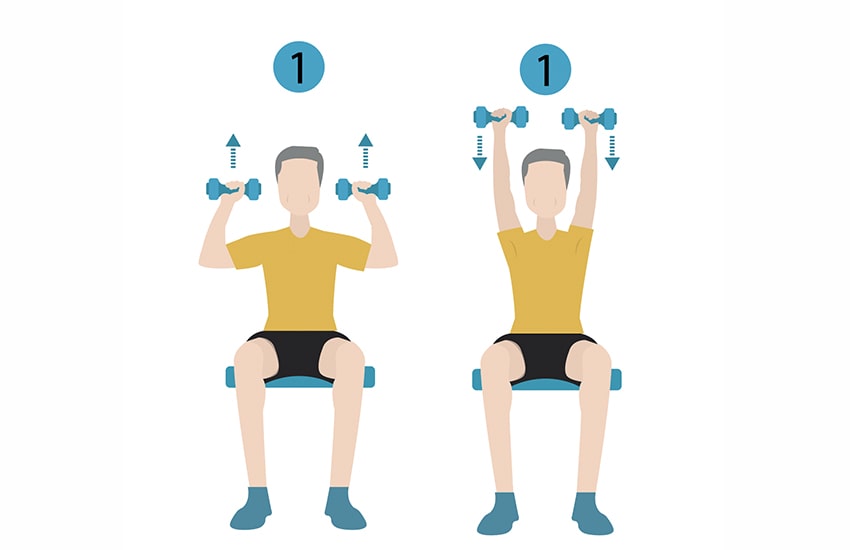
The seated shoulder press will help extend the arms overhead with an increase to strength, mobility, and endurance.
Steps:
- Choose a pair of low weight dumbbells or slide a resistance band under the seat, or sit on it, keeping it at an equal length on either side of the body.
- Sit comfortably in the chair with the hips as far back as possible. Ensure that the back is firm to the backrest of the chair.
- Keep the core (abs and lumbar) tight.
- Start with both elbows spread to the sides of the body and align them under the shoulders. Stick the chest out.
- Face the body straight, palms forward, gripping the dumbbells.
- Extend the arms up, reaching above the head until they’re fully extended (or get to a range that feels most comfortable). Don’t touch the hands together and keep both arms parallel to each other.
- Once the arm’s extension limit has been reached, slowly bring the hands down to the starting position, keeping the elbows spread. Don’t tuck the elbows toward the middle of the body, extend them out till the top of the back feels a pinching sensation (not hurting) at the shoulder blades.
2. Seated Front Shoulder Raises
| Difficulty | Sets/Reps | Time |
| Easy | 2-3/8-12 | 4 Minutes |
This exercise is particularly useful for holding objects in front of the body or even just extending an arm forward.
Steps:
- Grab a pair of dumbbells, resistance band, or a medicine ball.
- Sit comfortably in the chair with the hips as far back as possible. Ensure that the back is firm to the backrest of the chair.
- Keep the core (abs and lumbar) tight. Stick the chest out.
- With dumbbells, keep arms to the sides of the body, let them hang naturally with both palms facing toward the body.
- With a resistance band, slide band under the seat, or sit on it, until it’s at an equal length on both sides of the body. Then, keep both arms to the sides of the body, let them hang naturally with the palms facing toward the body.
- With a medicine ball, place the ball at the edge of the lap, keep the hands on either side while gripping the ball.
- Keeping the arms straight and the palms in their facing positions, continue to move the arms up in front of the body.
- Stop the motion when the arms are parallel with the floor and the hands are in direct vision of the eyes.
- Proceed to slowly return to starting position.
Chest
3. Seated Chest Press
| Difficulty | Sets/Reps | Time |
| Easy | 2-3/8-12 | 4 Minutes |
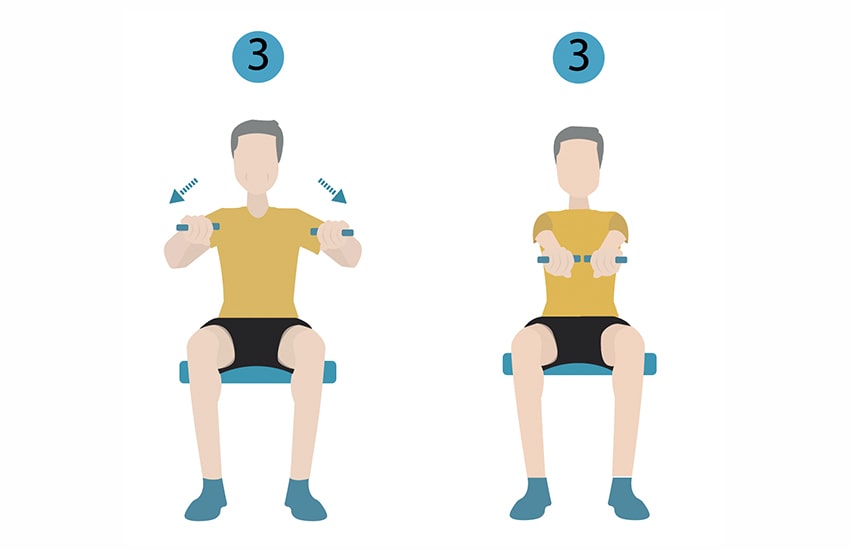
An exercise that not only uses chest muscles but also the shoulders and triceps, this is known as a compound movement because of the variety of muscles used at once.
Steps:
- Grab a resistance band.
- Place the resistance band at a point on the chair where it’s directly behind the back just under where the shoulder blades would be. Ensure that the resistance band isn’t able to move on the back of the chair; moving it during the exercise can result in injury or target the wrong muscle groups. To keep it secure, think of using a strong clip or pin or try having a family member of the senior’s help install a couple of shelving brackets to the back of the chair to keep the band positioned appropriately.
- Sit comfortably in the chair with the hips as far back as possible. Ensure that the back is firm to the backrest of the chair.
- Keep the core (abs and lumbar) tight. Stick the chest out.
- Keep both palms down, elbows bent and parallel to the shoulders. Both hands should be positioned just outside of shoulder width.
- Push the resistance band forward until the arms are fully extended in front of the body (don’t touch hands together).
- Slowly revert back to starting position.
Note: If a chair cannot be modified for the resistance band or there isn’t enough tension, the band can be wrapped around another stable device such as a post or beam.
4. Modified Push-Ups
| Difficulty | Sets/Reps | Time |
| Advanced | 2-3/8-12 | 5 Minutes |
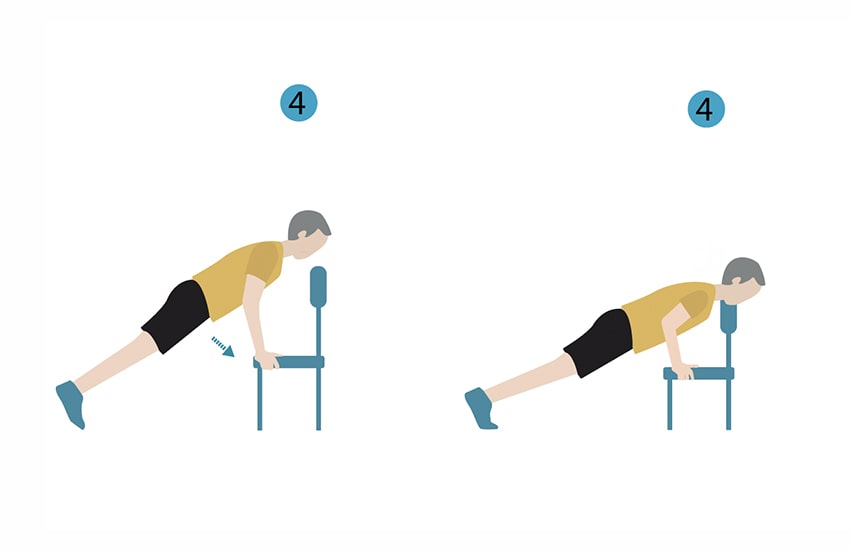
Steps:
- Stand to face the chair straight with the body.
- Place both hands on the sides of the chair’s seat. Keeping both arms slightly bent at the elbows, shift both feet backward a couple of feet until the body is in a diagonal position in front of the chair. Make sure that the buttocks isn’t high in the air, nor that the back is arched. The body should be in a straight line from shoulder to heel. If a senior is feeling resistance (tension) in their core, then they’re in the correct position. The elbows should be close to the sides of the body.
- Slowly bend the elbows, moving the body closer to the chair.
- Once the chin has almost touched the chair (or as close to the chair as possible), push back to starting position.
Note: Place the chair against a wall for more support. If not placed against a wall, make sure that the chair will not slip while doing this exercise. Be careful when gripping the chair as sweaty palms could slip off of the seat.
Biceps
There are two muscle heads to the bicep in our bodies. Biceps allow us to pick up objects and bring them closer to our body. We use our biceps for a majority of our arm movements, just for different purposes than that of our shoulders.
5. Seated Bicep Curls
| Difficulty | Sets/Reps | Time |
| Easy | 2-3/8-12 | 4 Minutes |
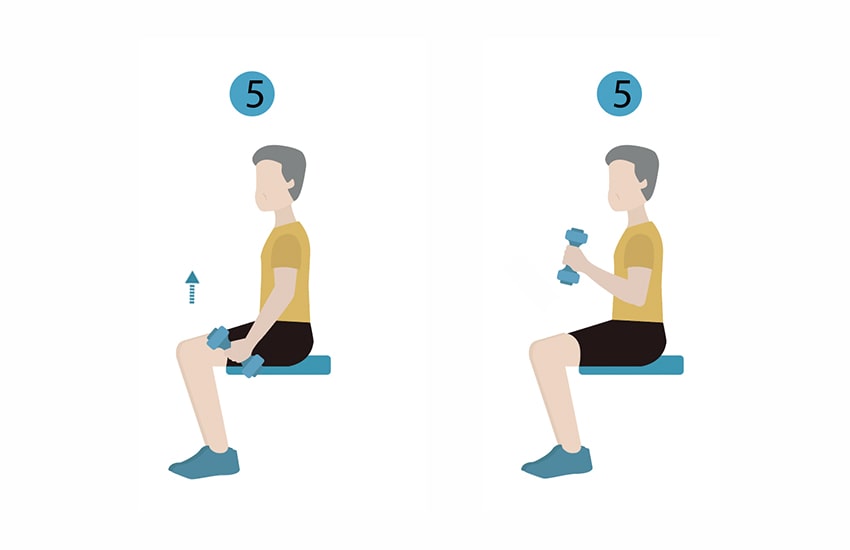
Steps:
- Grab a pair of dumbbells or a resistance band.
- If using a resistance band, slide it under the seat, or sit on it, until it’s at an equal length on either side of the body.
- Sit comfortably in the chair with the hips as far back as possible. Ensure that the back is firm to the backrest of the chair.
- Keep the core (abs and lumbar) tight. Stick the chest out.
- Keep both arms to the sides of the body, let them hang naturally with both palms facing forward, keeping the elbows tucked (at the sides of your body).
- Proceed to move both forearms in a curling motion from the sides of the body to the front of the shoulders (the senior doesn’t have to touch their hands to their shoulders for full range of motion).
- While keeping tension, slowly lower both forearms back to the starting position.
Triceps
While the triceps aren’t a huge part of picking up objects; if a senior doesn’t like hanging under-arm skin (extra skin or fat) and would like to tighten this area, tricep exercises are a massive help.
6. Isolated Tricep Extensions
| Difficulty | Sets/Reps | Time |
| Medium | 2-3/8-12 | 7 Minutes |
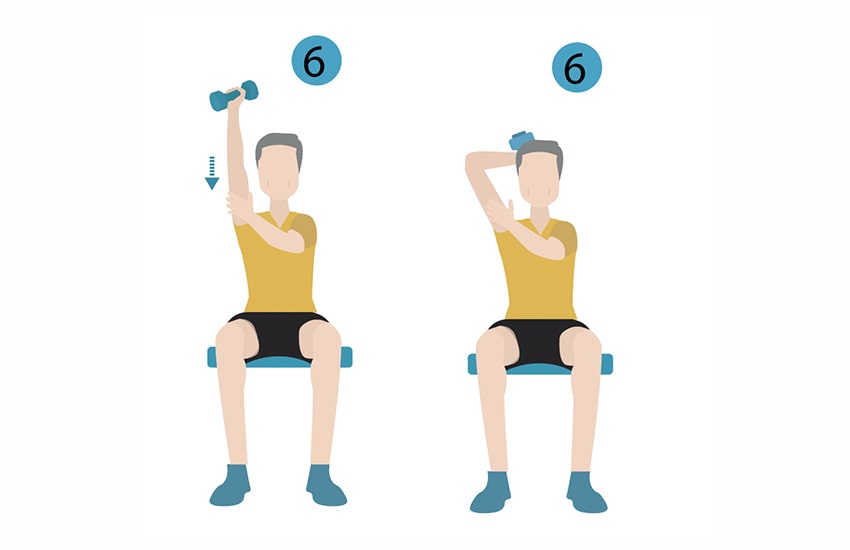
This exercise is easier to do if you’ve been developing shoulder motion.
Steps:
- Grab a dumbbell.
- Sit comfortably in the chair with the hips as far back as possible. Ensure that the back is firm to the backrest of the chair.
- Keep the core (abs and lumbar) tight. Stick the chest out.
- Keep both elbows high, in front of the body and one hand lowered behind the head creating a “V” shape. Use the other hand to brace the arm just under the elbow. Keep the helping hand in this position (without applying too much pressure). The hand with a dumbbell should have its palm facing toward the head.
- Raise the one arm with a dumbbell over the head until it is fully extended.
- Slowly lower the forearm back to the starting position.
- Repeat for both arms.
Core Exercises
The core is an essential part of everything we do in the day. Whether we’re standing, walking, bending over, or even sitting, we’re using our core. Without using our core for good posture, we could end up slouching our back which could lead to muscle tension and other similar problems.
7. Seated Knee-to-Chest
| Difficulty | Sets/Reps | Time |
| Easy | 2-3/8-12 | 4 Minutes |
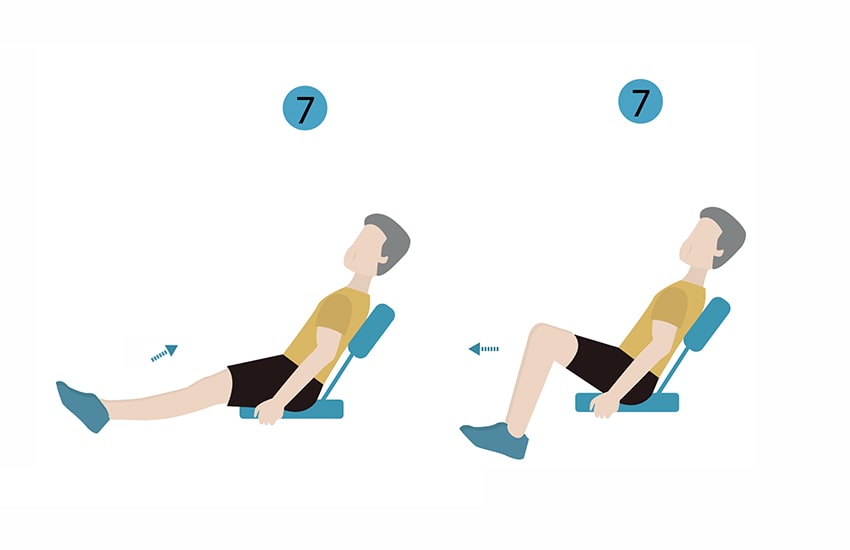
Steps:
- Sit comfortably at the edge of the chair without feeling like falling over.
- Keep the back straight and the core (abs and lumbar) tight. Stick the chest out.
- Place both hands at the sides of the chair and grip the seat to keep stable.
- Place both feet far out in front of the body and point the toes to the ceiling. Both feet should be diagonal to the hips.
- Slowly, raise both legs closer to the body while bending the knees. Get to as close to the chest with both knees as possible.
- Slowly, perform this motion in the exact opposite direction back to starting position. This equals one “rep”.
Note: You can isolate this movement with one leg at a time as well. Just make sure the opposite leg is firmly planted on the ground before you begin lifting.
8. Extended Leg Raises
| Difficulty | Sets/Reps | Time |
| Medium | 2-3/8-12 | 4 Minutes |
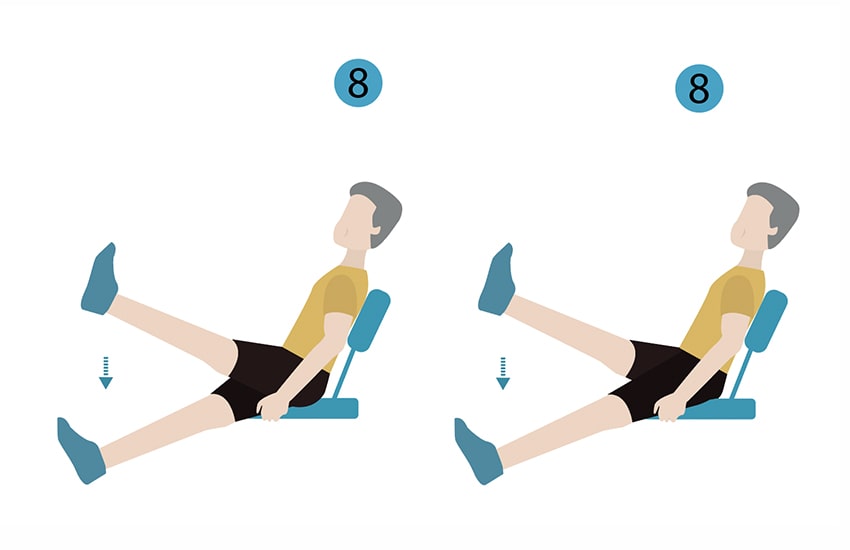
Steps:
- Sit comfortably at the edge of the chair without feeling like falling over.
- Keep the back straight and the core (abs and lumbar) tight. Stick the chest out.
- Place both hands at the sides of the chair and grip the seat to keep stable.
- Place both feet far out in front of the body and point the toes to the ceiling. Both feet should be diagonal to your hips.
- Lift one leg up to the highest point possible (optimal range ending at the hips) without moving the center of the body. The other leg will stay in starting position.
- Slowly lower the leg back to starting position then repeat with the opposite leg.
- Kicking both legs equals one “rep”.
Note: This movement can be isolated with one leg at a time as well. Just make sure the opposite leg is firmly planted on the ground before beginning lifting the leg.
9. Leg Kicks
| Difficulty | Sets/Reps | Time |
| Advanced | 2-3/8-12 | 5 Minutes |
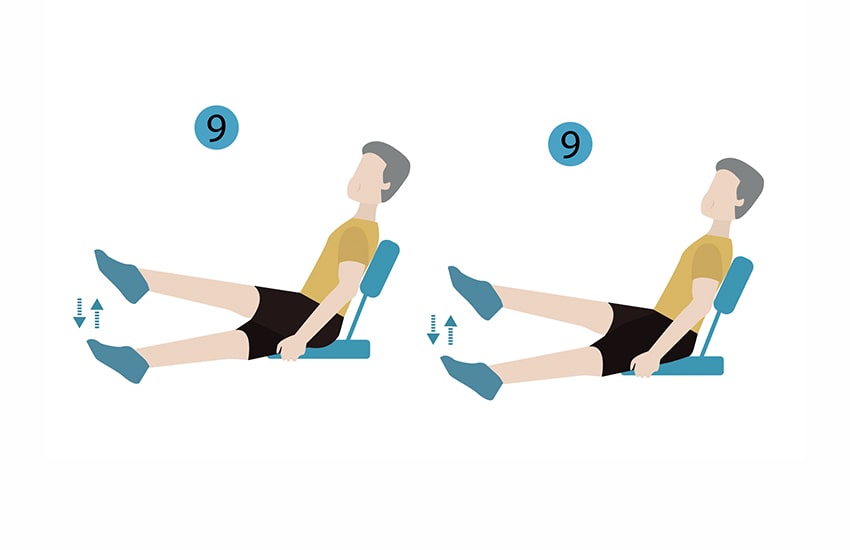
This exercise is very similar to that of the extended leg raises in terms of motion.
Steps:
- Sit comfortably at the edge of the chair without feeling like falling over.
- Keep the back straight and the core (abs and lumbar) tight.
- Place both hands at the sides of the chair and grip the seat to keep stable.
- Place both feet far out in front of the body and point the toes forward. Both feet should be diagonal to the hips. When shifting both feet in front, slowly lean the upper body backward to stabilize.
- Lift one leg up to the highest point possible (hopefully ending parallel to the hips) without moving the center of the body.
- Slowly lower the leg back to starting position then switch with the other leg. A great way to think of this movement is to pretend that the person is swimming, kicking their legs in the water.
- Each one kick per leg counts as one “rep”.
Note: To make this exercise more challenging, try not to touch the feet to the ground until the exercise is finished. This movement can also be isolated with one leg at a time. Just make sure the opposite leg is firmly planted on the ground before beginning lifting.
RELATED: 22 Indoor Activities For Seniors
10. Modified Planks
| Difficulty | Sets/Reps | Time |
| Advanced | 2-3/30 Seconds | 4 Minutes |
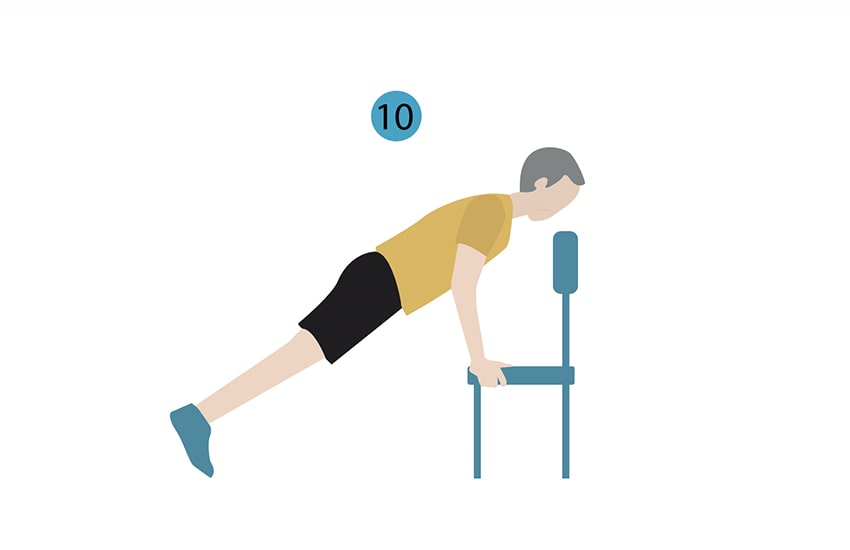
The plank exercise is known for being one of the most popular core exercises for any age. The exercise increases tension on the core, causing the body to keep stable. Training with this movement will help in a variety of ways, one being the ability to keep good posture while seated.
Steps:
- Stand to face the chair straight with the body.
- Place both hands on the sides of the chair’s seat. Keeping both arms slightly bent at the elbows, shift both feet backward a couple of feet until the body is in a diagonal position in front of the chair. Make sure that the buttocks isn’t high in the air, nor that the back is arched. The body should be in a straight line from shoulder to heel. If a senior is feeling resistance (tension) in their core, then they’re in the correct position.
- Keep in this position for 30 seconds (or however long is comfortable without pain) then stand up or sit down to take a slight break.
- Repeat 2-3 times.
Note: Place the chair against a wall for more support.
11. Tummy Twists
| Difficulty | Sets/Reps | Time |
| Medium | 2-3/8-10 | 5 Minutes |

This is a well-rounded exercise for the entire core and can aid in stretching the spine. This should be performed using a medicine ball or a similar object for full tension in the abdomen.
Steps:
- Grab a medicine ball (or similar object).
- Sit comfortably in the chair toward the edge of the seat for extra room. Keep the core (abs and lumbar) tight. Stick the chest out. Both hands should be in front of the body gripping the sides of the medicine ball, with elbows bent.
- Lift the ball a couple inches off the lap then rotate the upper body to the right, keeping the ball in front of the body.
- Rotate to the middle of the body then rotate to the left, finish by rotating back to the middle.
- Each “rep” is one full rotation.
Leg Exercises
Unless confined to a wheelchair or undergoing another circumstance, we use our legs for all of our daily mobile movements. Standing, walking, running, climbing stairs, and bending down to pick up objects are all part of using our legs. Keeping up leg strength as we age is a physical factor that we should all think of.
But, jogging, running, and climbing stairs can take a toll on the joints, especially if an older adult has an injured knee or has recently gone through surgery. So instead, using chair exercises can keep leg strength and endurance up while protecting the joints.
Before getting started on the following exercises, make sure to have the right shoes! Believe it or not, shoes play a big role in exercising. While a loved one might not be running, hiking, or lifting heavy weights, they’re still going to want shoes that are cushioned (for comfort) and help with stability. If they’re performing anything like a squat, then shoes that are flat can aid in keeping the back straight and the knees aligned instead of them dipping (buckling) inward toward the middle of the body; this is something that should be avoided.
12. Sit-to-Stands (aka Chair Squat)
| Difficulty | Sets/Reps | Time |
| Easy | 2-3/8-12 | 5 Minutes |
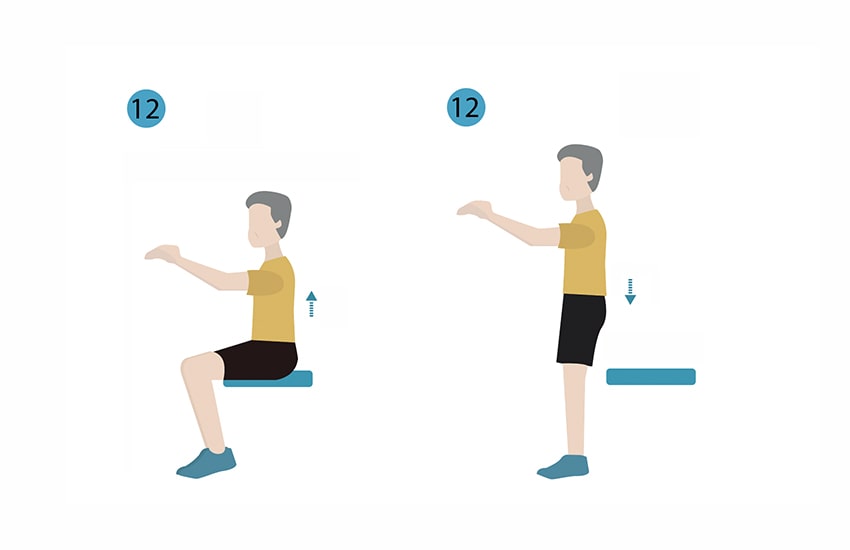
This exercise should be started off with the older adult’s own body weight. If they feel like it’s too easy and their body feels good about the movement, they can add weight by carrying a medicine ball or another of-equal-to weight object.
Steps:
- Sit comfortably in the chair toward the edge of the seat.
- Keep the core (abs and lumbar) tight. Stick the chest out.
- Ensure the toes are pointed forward or slightly outward to both sides; keep both hands in front of the body in a comfortable position for balance.
- Slowly, sit up from the chair until fully standing. Check the knee placement when moving from sitting to standing so they aren’t bending inward; instead, they should be projecting outward from the middle of the body. This exercise requires using the hips, not the knees, to thrust the body to a standing position.
- Sit back down, while checking for that knee placement, to starting position.
Note: As an extra toning secret, squeeze the glutes (buttocks) together when moving to the standing position, this will engage the glutes more and start toning the muscles.
13. Modified Squats
| Difficulty | Sets/Reps | Time |
| Medium | 2-3/8-12 | 5 Minutes |

It doesn’t matter what age we are, squatting is noted as one of the most beneficial exercises a person can perform. However, not everyone can perform a typical squat; sometimes assistance is needed.
Steps:
- Position the chair in front of the body, facing toward the back-end. Take a single step back from the chair.
- Center the body directly with the middle of the chair. Place both hands out in front of the body.
- Position both feet at hip-width apart, directly under the body.
- Point the toes forward or partially away from the center of the body.
- Keeping the knees behind the toes (don’t let them overlap the toes), bend both knees and loosen the hips, moving the buttocks toward the floor. Watch both knees so they don’t fall inward toward the center of the body – force them away from your body.
- Once at a stop in the squat position, push the body back to a standing position.
Note: If the chair is moving or is unstable, place the front-end against a wall for stability. Also, if the chair’s back is high, you can place your hands directly on top for stability.
14. Knee Extensions
| Difficulty | Sets/Reps | Time |
| Easy | 2-3/8-12 | 6 Minutes |
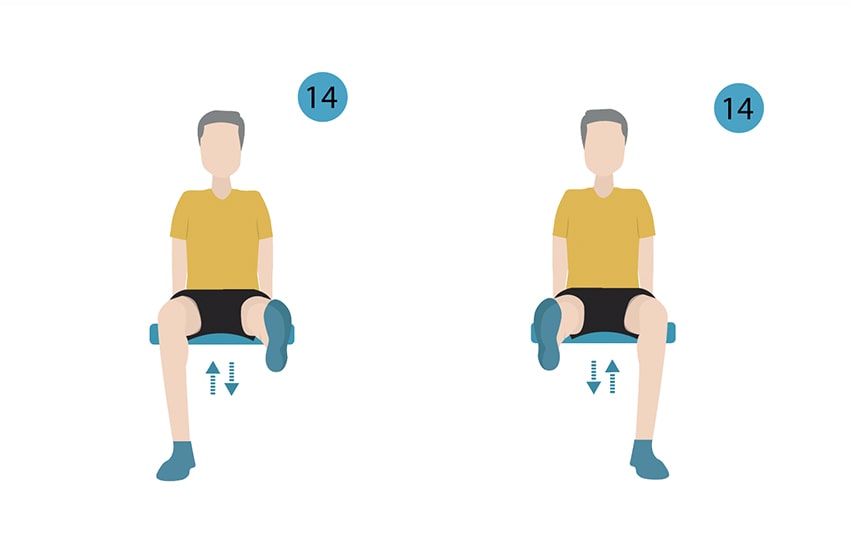
Steps:
- Sit comfortably in the chair with the hips as far back as possible. Ensure that the back is firm to the backrest of the chair.
- Keep the core (abs and lumbar) tight. Stick the chest out.
- Place both hands at the sides of the chair and grip the seat to keep stable.
- Keep both legs at a 90-degree angle with the chair.
- Extend one leg in front of the body up in the air until full extension is made. Keep the other leg in its original position for stability.
- Slowly draw the one leg back to starting position.
- Repeat for both legs to count as one set.
15. Heel Slides
| Difficulty | Sets/Reps | Time |
| Easy | 2-3/8-12 | 6 Minutes |
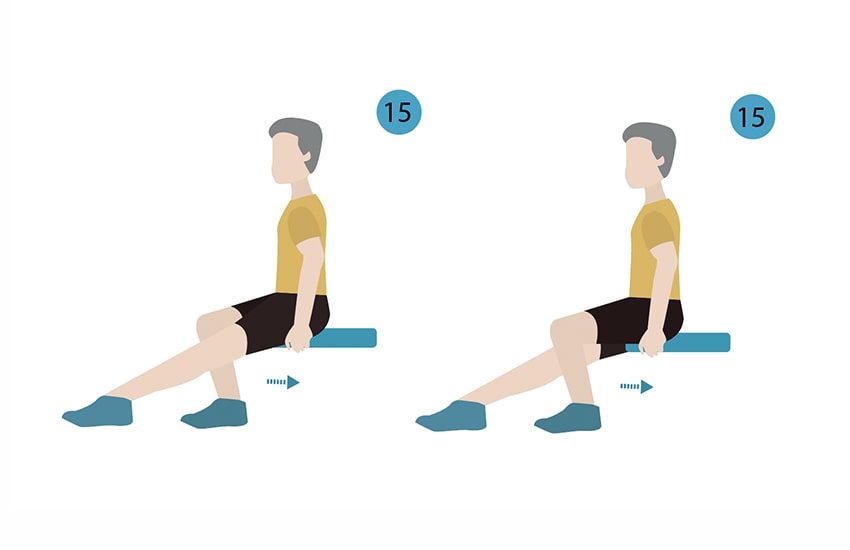
If a senior is currently experiencing major knee pain, this might not be a suitable exercise due to pressure sustained on the joints. If a senior does have knee pain, they should keep the pressure to a minimum so as not to agitate the joint. To protect the floor from damage, grab a towel or a blanket and place it on the ground in front of the chair.
Steps:
- Sit comfortably in the chair toward the edge of the seat.
- Keep the core (abs and lumbar) tight. Stick the chest out.
- Place both hands at the sides of the chair and grip the seat to keep stable.
- Extend one leg far out in front of the body and point the toes forward. The extended leg’s foot should be diagonal to the hips. If using a blanket or other item, place the foot on top. The other leg should be naturally bent, close to the body with the foot planted on the floor.
- With the extended leg, keep the foot flat, push against the floor and drag the foot slowly toward the body until it reaches the flexed position of the other leg.
- While keeping pressure, extend the leg back to the starting position.
- A single rep is when performing the full movement of pulling then pushing the foot back to the starting position.
16. Seated Calf Raises
| Difficulty | Sets/Reps | Time |
| Easy | 3/20-30 | 6 Minutes |
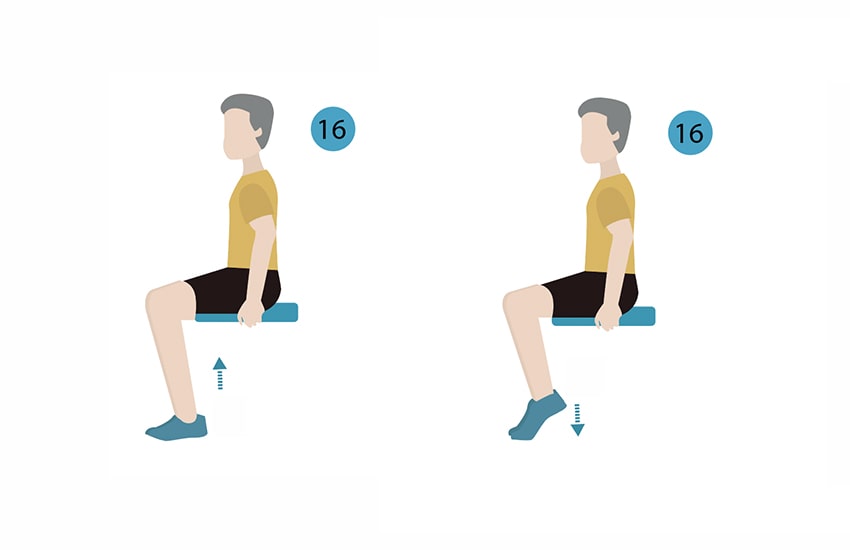
If a senior is feeling tense in their calves and it isn’t very easy to squat, calf raises might help stretch those tense muscles or joints around the lower part of the leg.
Steps:
- Sit comfortably in the chair with the hips as far back as possible. Ensure that the back is firm to the backrest of the chair.
- Keep the core (abs and lumbar) tight. Stick the chest out.
- Place both hands at the sides of the chair and grip the seat to keep stable.
- Keep both legs at a 90-degree angle with the chair. Both feet should be flat on the floor.
- Slowly, extend the heels of your feet upward, pushing the toes on the ground and lifting the heels in the air.
- Place both feet back to the starting position.
- Repeat this movement for 20 or more reps to create a “burning” feeling in the calves.
Note: If this movement feels too easy with just bodyweight, place a medicine ball or another weight of equal value towards the edge of the lap (almost to the knees). Or, put a shallow object underneath both feet (about 3-4 inches off the ground) for a full range of motion.
Stretching Exercises
Stretching is so tremendously important. Not a single personal trainer or physical therapist will say that stretching is a bad idea when it comes to exercise because there are so many benefits to keeping the body flexible and relaxed, especially after performing the above exercises! Stretching can be done in a variety of ways, each equally beneficial.
There are plenty of flexibility exercises that can be done while standing or lying on the floor. Certain upper back stretches can definitely help with some of the previously outlined exercises in this guide.
But, if the floor isn’t suitable then no worries, we’ve got it covered with some chair stretching exercises. You can also modify some other stretches to include using a chair for extra stability.
How Often Should a Senior Stretch?
If over the age 65, stretching should be done anywhere from 2-5 times per week, depending on tension and mobility needs.
Stretching doesn’t necessarily have to do with periods of time compared to the frequency of stretching throughout the day. Set about 10-15 minutes aside per day to perform the stretches. They should have patience and take deep breaths during stretching to relax both the body and mind.
When To Stretch
There has been much debate on when people should stretch during the day. Fitness professionals and doctors offer different opinions as to when and what time of day a person should be stretching.
17. Neck Turns
| Difficulty | Sets/Reps | Time |
| Easy | 3-5/20-30 Seconds | 5 Minutes |
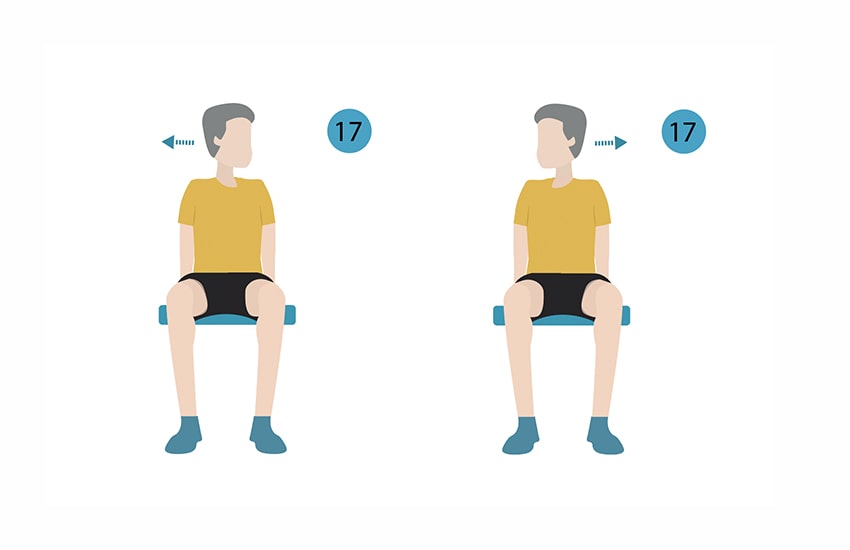
A stiff neck is highly uncomfortable. If a senior isn’t getting proper sleep because of pain in their neck, or can’t rotate their head easily then stretching it might improve the discomfort.
Steps:
- Sit comfortably in the chair with the hips as far back as possible. Ensure that the back is firm to the backrest of the chair. Secure the core by keeping the back upright and the spine straight. Keep both feet flat on the floor.
- Keeping in this position, rotate the head to either the left or right until feeling a gentle stretch. Keep in this position for 20-30 seconds.
- After the time passes, rotate to the opposite direction.
- Repeat in both directions 3-5 times or as comfortable.
18. Seated Backbend
| Difficulty | Sets/Reps | Time |
| Easy | 3-5/10-20 Seconds | 4 Minutes |
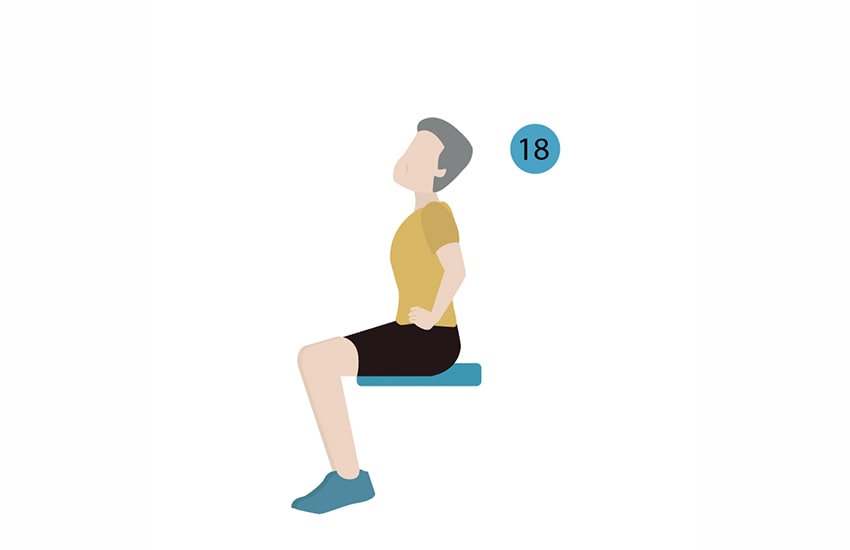
If a senior is feeling pain or tightness in their lower back, neck, or chest, this stretch covers it all.
Steps:
- Sit comfortably at the edge of the chair. Secure the core by keeping the back upright and the spine straight. Keep both feet flat on the floor. Keep the hips and lower body in this stable position.
- Place both hands on the hips.
- Slowly arch the back inward, with the stomach pushing outward, then lean backward using only the upper body.
- Extend the back in this pose until a comfortable stretch is obtained.
- Keep in this position for 10-20 seconds, then release and return to the starting position.
- Repeat pattern for 3-5 times or as comfortable.
19. Seated Overhead Stretch
| Difficulty | Sets/Reps | Time |
| Easy | 3-5/10-20 Seconds | 4 Minutes |
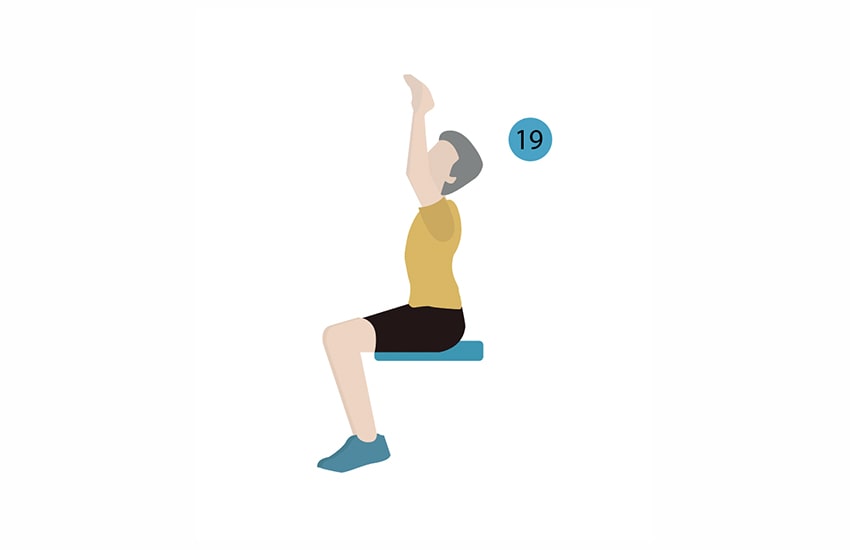
Steps:
- Sit comfortably at the edge of the chair. Secure the core by keeping the back upright and the spine straight. Keep both feet flat on the floor. Keep the hips and lower body in this stable position.
- Place both hands on the hips.
- Slowly, raise both hands from the hips over the head, interlocking both hands at the top.
- Gently arch the back inward, pushing the stomach out – causing a stretching in the abdomen.
- Hold this position for 10-20 seconds then release to starting position.
- Repeat 3-5 times or as comfortable.
20. Seated Side Stretch
| Difficulty | Sets/Reps | Time |
| Medium | 3-5/10-20 Seconds | 8 Minutes |
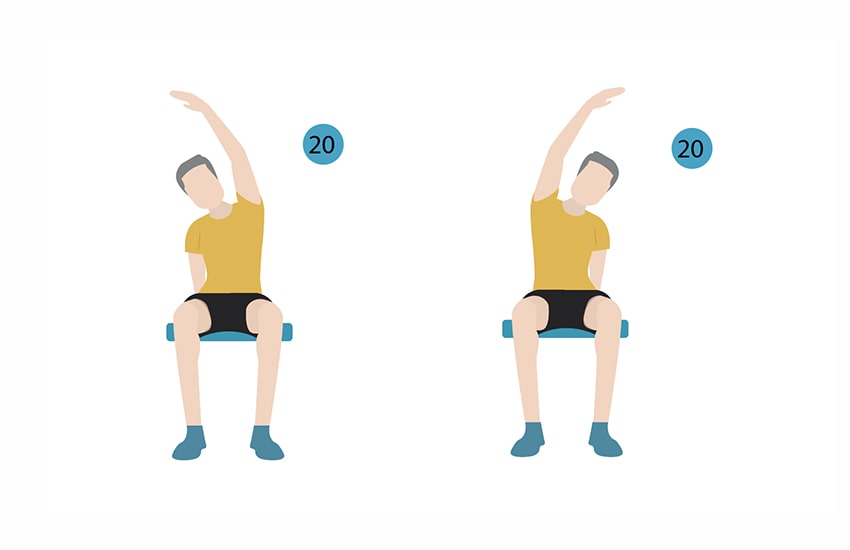
Steps:
- Sit comfortably at the edge of the chair. Secure the core by keeping the back upright and the spine straight. Keep both feet flat on the floor. Keep the hips and lower body in this stable position.
- With the right hand, grip the right side of the seat to stabilize.
- Extend the left hand above the head making a similar shape to that of a spoon or a lengthened “C”.
- Simultaneously, slowly shift the upper torso to the right side without collapsing the abdomen (keep it tight).
- Hold the position for 10-20 seconds then shift sides.
- Repeat 3-5 times, or as comfortable, per side.
21. Seated Hip Stretch
| Difficulty | Sets/Reps | Time |
| Easy | 3-5/10-20 Seconds | 8 Minutes |
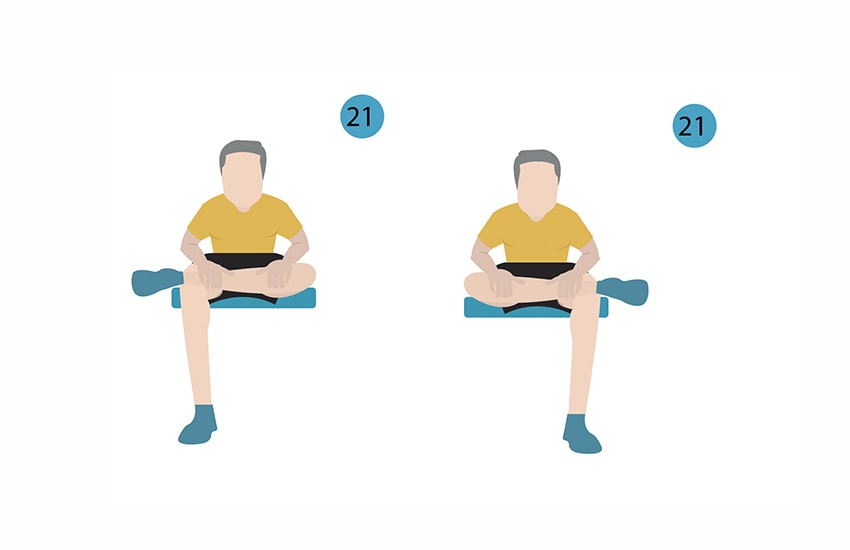
The hips are a huge factor in our day-to-day activities. If a senior is slouching, finding it difficult to move their legs at the hips, feeling like their waddling when they walk or have a pattern of pain in their hip’s general area, they might find this to be a helpful stretch.
Steps:
- Sit comfortably in the chair. Secure the core by keeping the back upright and the spine straight. Keep both feet flat on the floor.
- Cross one leg on top of the other creating a triangle between the legs. Ensure that the crossed leg’s ankle is past the other leg.
- Slowly bend the upper body forward, keeping the spine straight and core tight. Stop when feeling resistance in either the glutes or hips.
- Hold this position for 10-20 seconds then shift sides.
- Repeat 3-5 times, or as comfortable, per leg.
Conclusion
Older adults should never overexert themselves doing any of the above movements; this could lead to injury or worse. If their body is resisting any of the movements suggested, they shouldn’t push their body further. Our bodies talk to us when we exercise, they tell us when something is a good idea or when it’s a terrible one. Our entire body is connected by a muscle chain and just like a regular chain, if we have a chink, the other links won’t perform the same.
If a senior, or their caretaker, is trying to get into a healthier routine, nutrition should also be a factor to consider to correlate with these exercises. Healthy foods and snacks should be included in an everyday cycle and can even boost energy levels if a senior is experiencing low energy.
When a senior is performing any of these chair exercises, they should consider what their body is saying. It’s okay to ask for help or take things slower than usual when performing any of the exercises listed.
If you have any questions or recommendations for more exercises you’d like to see, feel free to ask us in the comments below!
Disclaimer: This content is for informational and educational purposes only. It is not intended to provide medical advice or to take the place of such advice or treatment from a personal physician. All readers/viewers of this content are advised to consult their doctors or qualified health professionals regarding specific health questions. Neither California Mobility nor the publisher of this content takes responsibility for possible health consequences of any person or persons reading or following the information in this educational content.
We hope this guide was helpful.
Struggling with mobility in your home or know someone who is? We’re here to help. Contact us today to see how we can help modify the home for a more comfortable life:


